DIY Shooting Stand
The DryFire simulator will sit on any horizontal surface or it can be fitted to a photographic tripod.
However, surfaces are not always in the right place, tripod legs have a habit of being kicked over and cables can be a trip hazard.
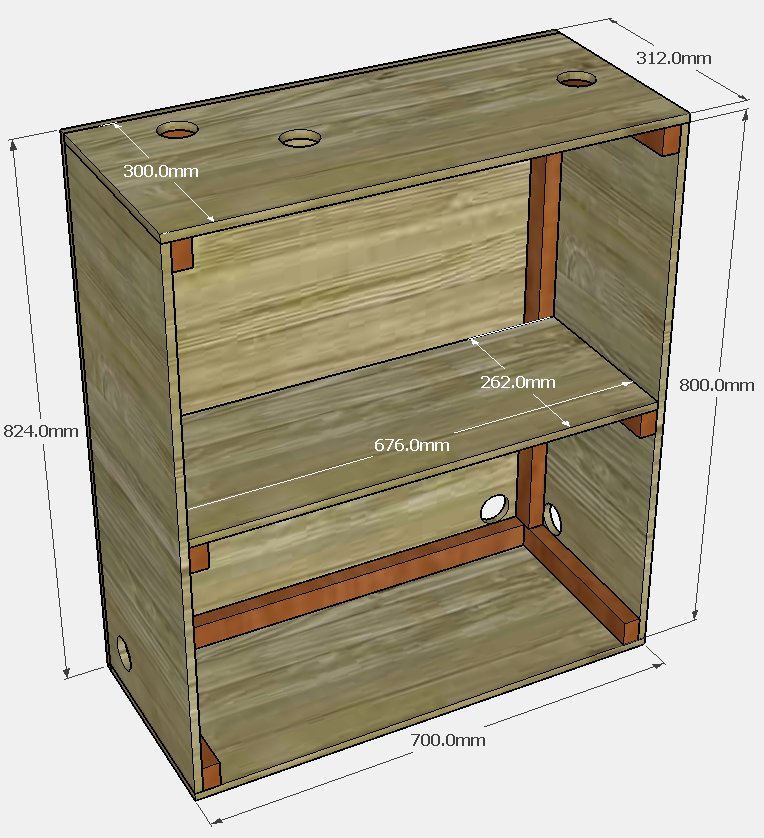
A shooting stand takes up very little room, keeps everything together and enables you to set things up exactly the same for every DryFire session. The three possible designs shown below can be assembled from 12mm plywood and they all have 300mm sides, top and bottom - so the overall depth is 312mm.
Show us yours!
Please send us some photos if you build your own stand - we are very keen to see what people do.
Also let us know if you have made tweaks to the design to make it work better for you.

Notes
The remainder of this page covers two versions with suitable holes for mains, USB and projector cables.
The projector is not required if you are using the laser-only version of DryFire
The dimensions shown are a suggestion.
The overall height can be changed but be careful that the simulator won't be hit by the muzzle during gun movement required for low targets like rabbits.
To prevent it being knocked off, the simulator can be secured to the top by drilling a 6.5mm hole and using a 1/4-20 x 3/4 UNC bolt or cap head screw to fit into the tripod bush in the base of the simulator.
Tools
- Circular saw or bench saw.
The 8' x 4' plywood panel can be rough-cut in-store to make it easier to handle.
Note: if you are buying a circular saw bear in mind that prices for cordless saws often do not include the price of batteries and charger. A mains powered saw will have trailing wires but it will cost far less and last for decades.
You could even convert a circular saw into a bench saw - see here and here!
As a general rule, the more teeth a saw blade has, the finer the cut will be. So, a 165mm diameter, 60T (60 teeth), 48T or 40T blade will produce a smoother cut than 165mm 24T. A low cost circular saw with a replacement blade will cut slower but produce excellent smooth cuts.
- Drill press or hand-held lithium drill.
- 3.5mm bit for screw clearance holes.
- A countersink bit.
A good quality chatter free countersink bit is a good investment for cutting perfect countersinks.
- 51mm (2") hole cutter saw.
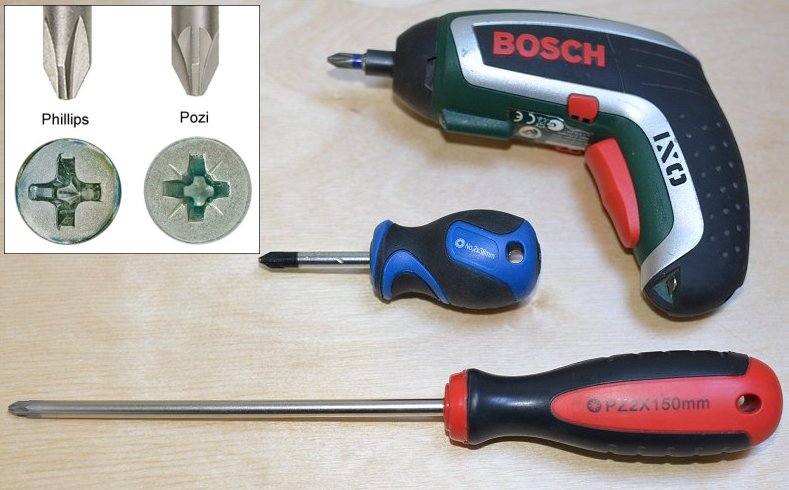
- Pozi No 2 screwdriver. A dumpy (short) version is useful for getting into confined spaces while a lithium powered screwdriver (with a Pozi 2 bit) makes life very easy!
Materials
- Plywood: one sheet 2440mm x 1220mm x 12mm (8' x 4' x 1/2")
The plywood sheet can be rough-cut in-store to make it easier to transport.
- Plywood comes in different types (Baltic birch plywood is excellent - but expensive) and grades.
- Battens: three lengths 2440mm x 38mm x 25mm (8' x 1.5" x 1") sawn timber.
- Screws: approximately forty 3.5mm x 35mm Pozi countersunk wood screws.
You may also need some 45mm length screws - see the assembly notes below.
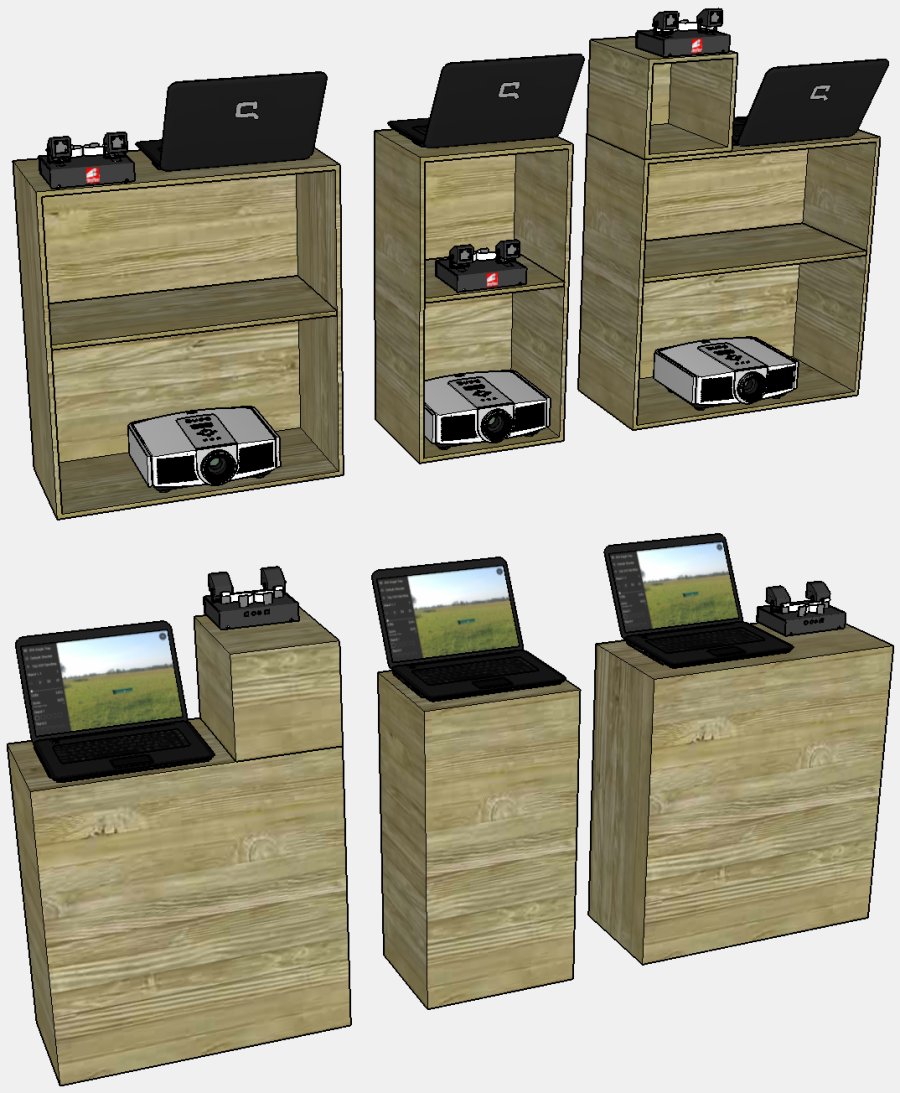
Version 1
This version is a single box to put the laptop and simulator side by side at roughly desk top height.
If you are concerned that the stand may fall backwards or forwards you can add extra length battens at the bottom of the sides to increase overall depth and give more stability.

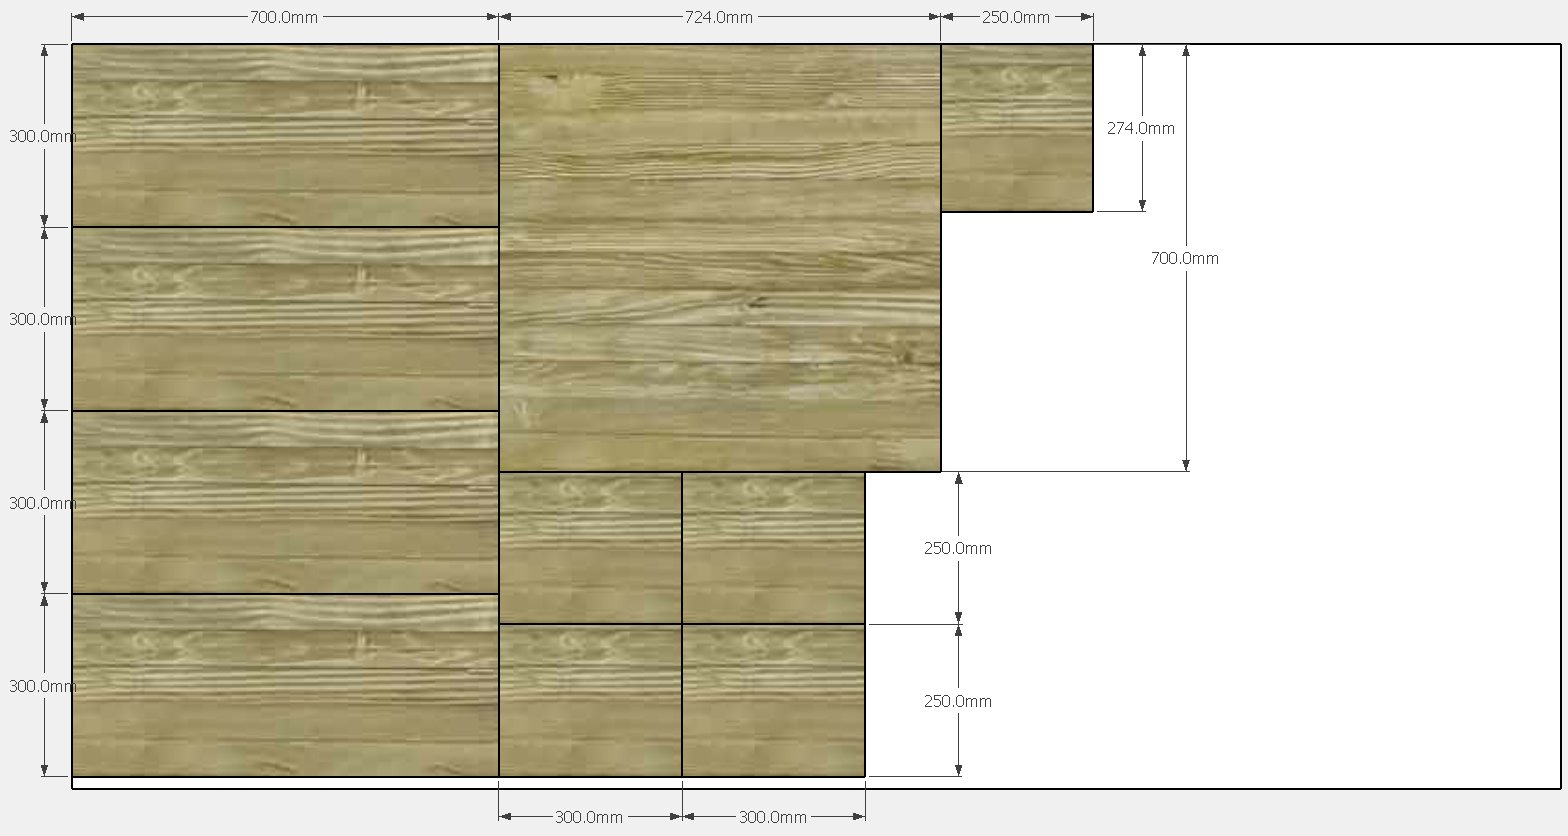
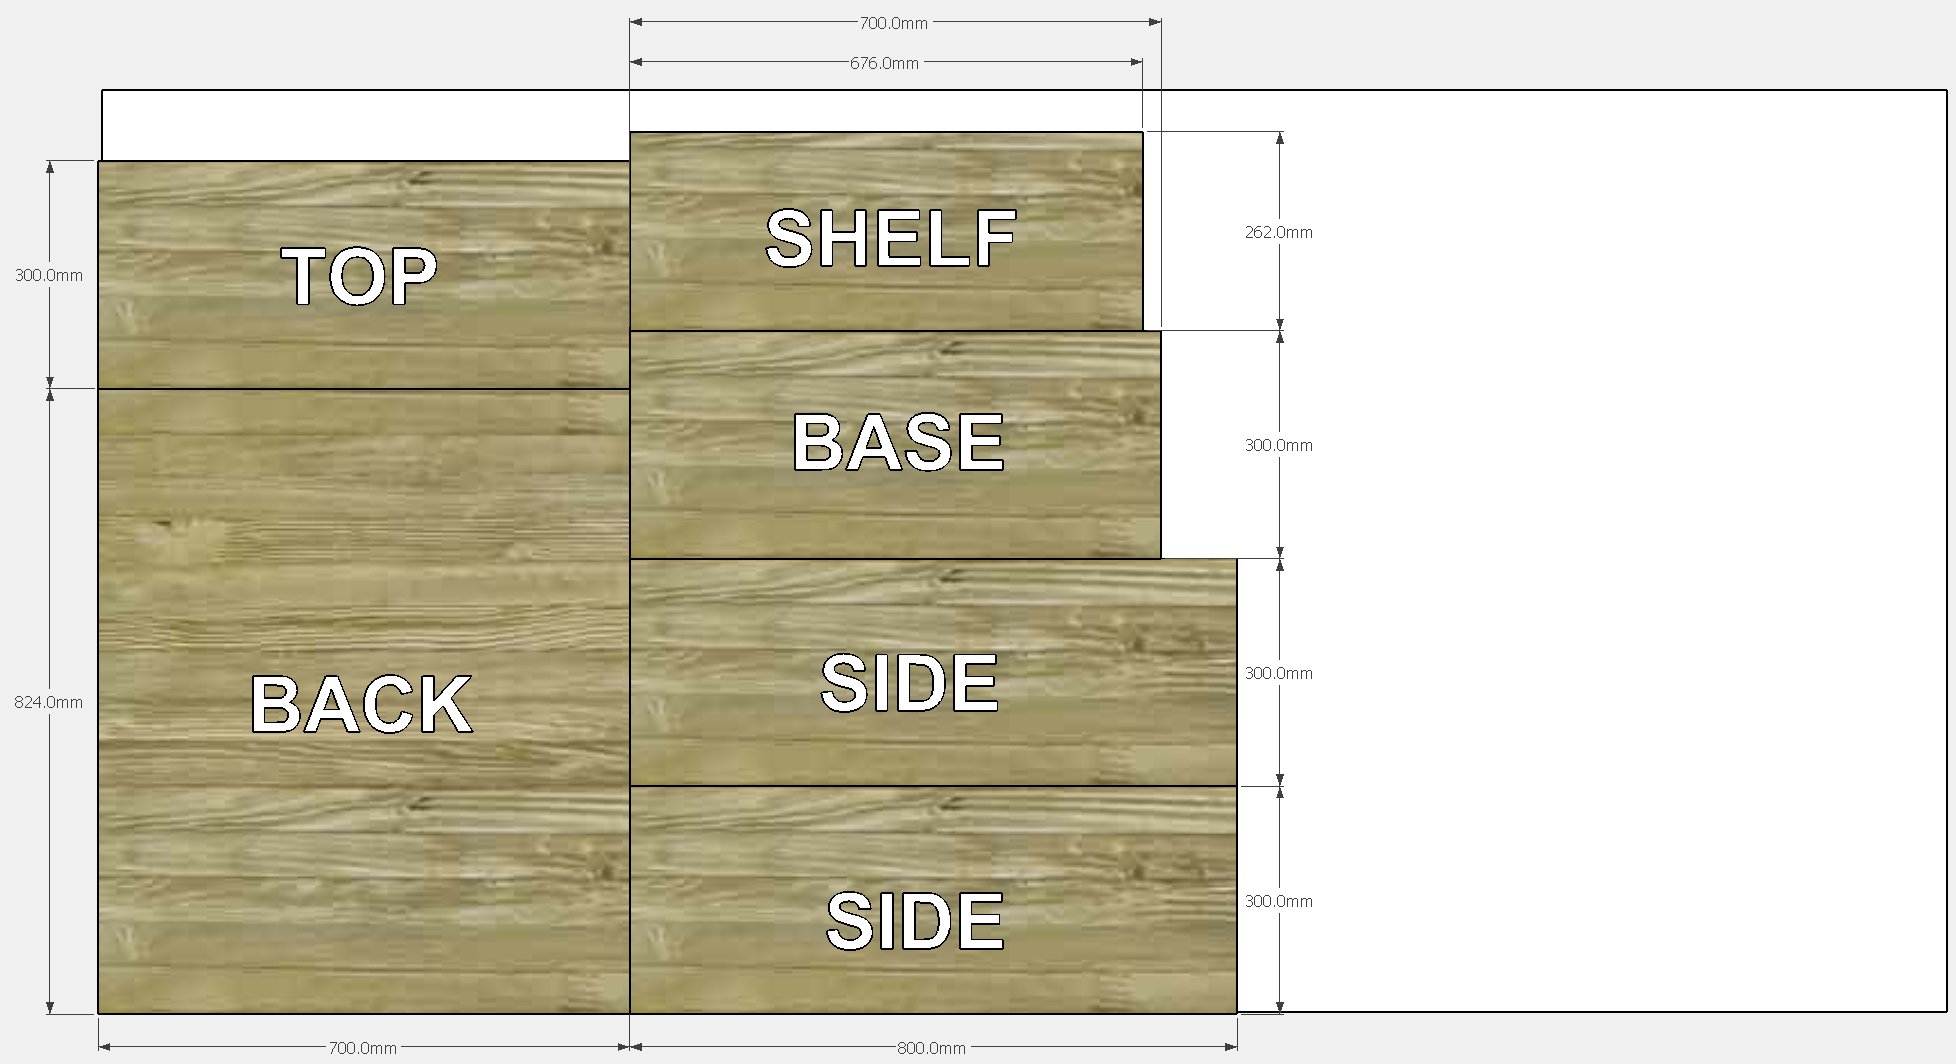
Cutting plan
Click on the image below for a larger version of the cutting plan.
Assembly
The shooting stand can be screwed together but you can, if you wish, add PVA wood glue glue for additional rigidity when fitting the battens. However, screws can be undone - glue can't - so do a test assembly with screws before disassembling and adding glue.
- Cut out the panels.
It is recommended to cut the shelf oversize - it can then be trimmed down for a good fit after the other parts are screwed together.
- Cut the 50mm diameter cable holes using a hole cutter saw.
Hole cutting saws tend to make a mess as the hole breaks through. It is recommended to clamp the panel to some scrap wood/ply/MDF backing before cutting the hole.
- Sand down the panels.
If you intend to seal, oil, or paint the panels now would be the time to do it. Any finish should be applied to both sides of the panels to prevent warping.
- Cut the battens to length.
- Screw the side panels to the battens. Note: the sides are not the same, one is the mirror of the other.
You can screw the panels to the battens from the outside (drill and countersink clearance holes in the panels) or the battens to the panels from the inside (drill and countersink clearance holes in the battens).
The screwdriver will provide sufficient force to fix the screws after they go through the clearance holes - additional pilot holes are not required.
- Screw the battens to the top and bottom.
If you are screwing the battens to the panels, with clearance holes in the battens, you will need 45mm screws to go through the 38mm battens.
- Screw the top and bottom to the sides - check for square.
- Screw the back to the sides, top and bottom - check for square.
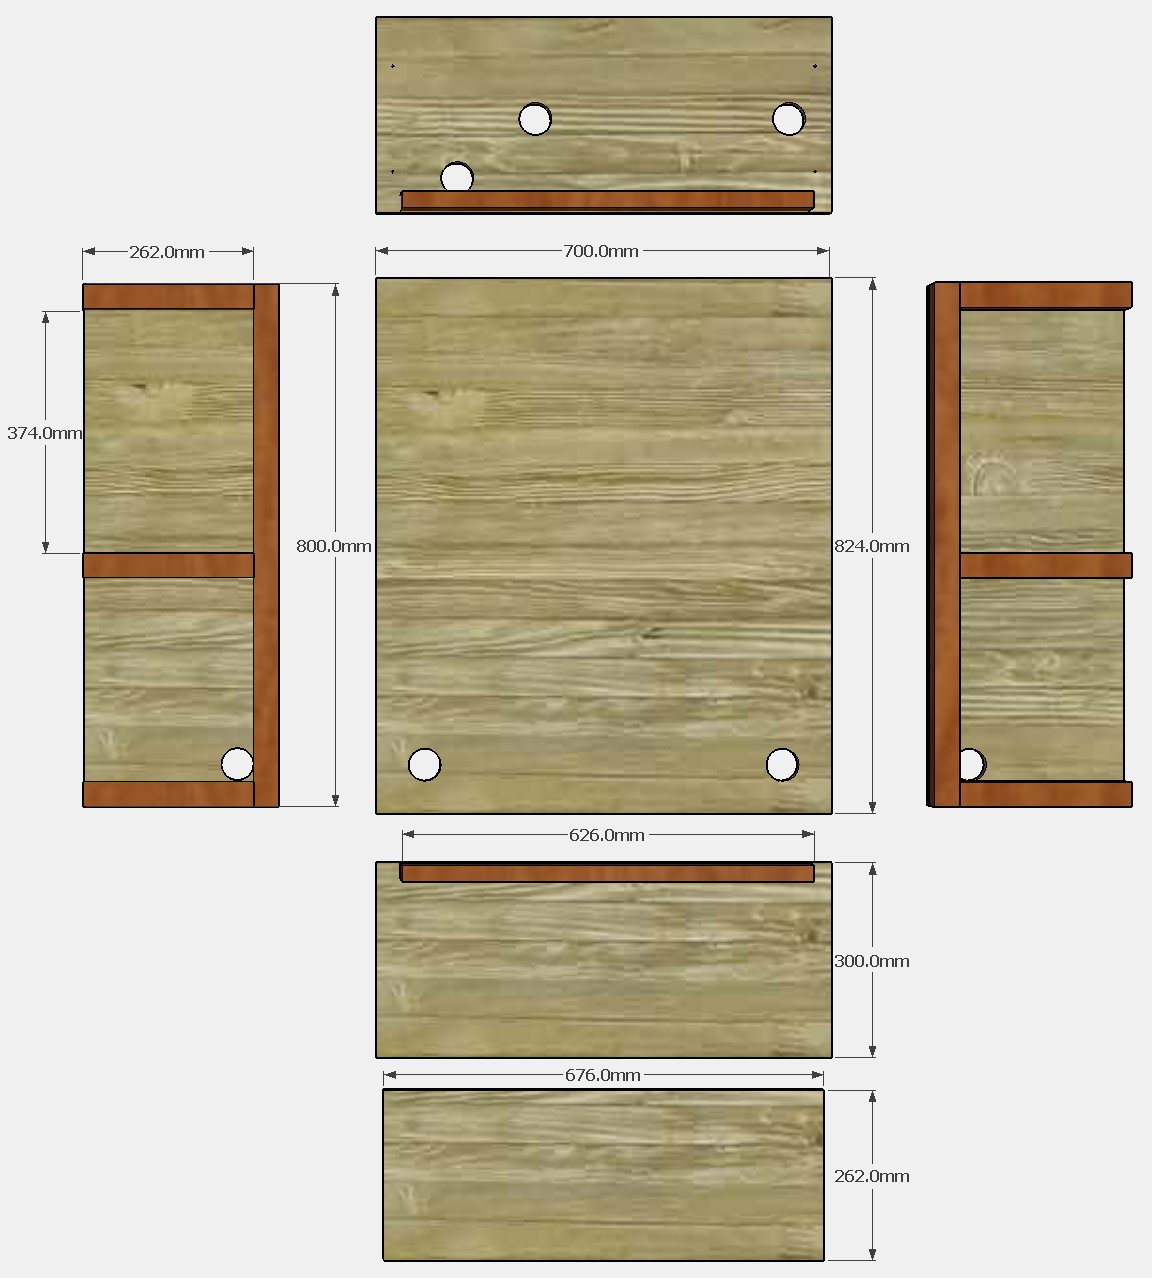
Click on the image below for a larger version of the panels laid out for assembly.
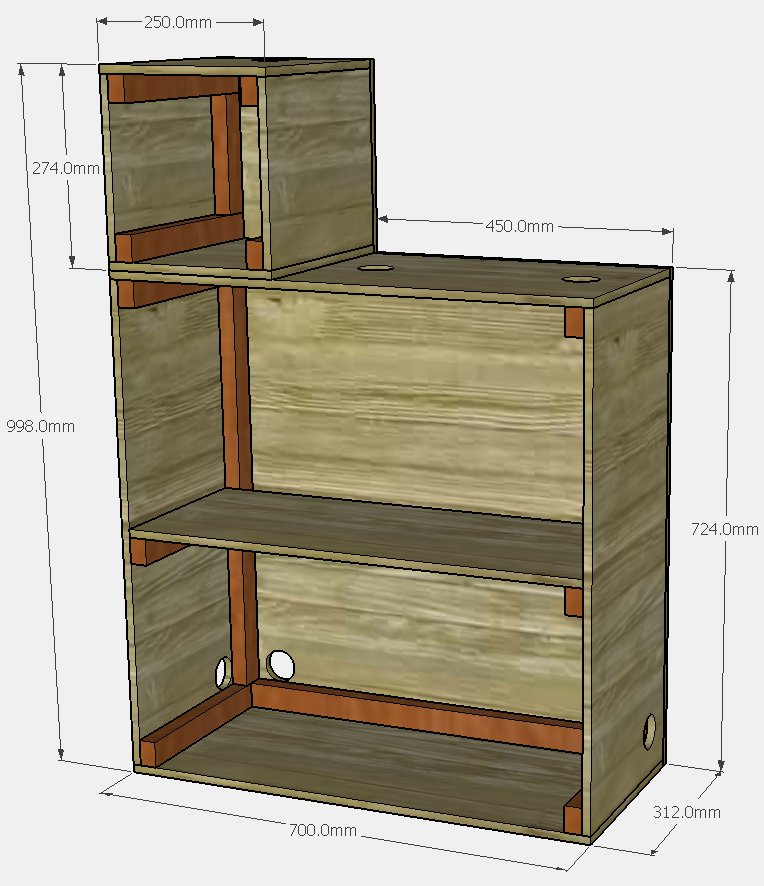
Version 2
Having the laptop screen lower than the simulator means it cannot get in the way of low wide targets.
This version is assembled in a similar way to version 1
Note: this version puts the simulator slightly higher than the User Guide recommends. However, things will still work fine as long as you measure from the floor to the top of the simulator metal case.
Click on the image below for a larger version of the cutting plan.